- built and photographed by Martin Gregorie
This timer uses the flow rate of Silly Putty, a viscoelastic material, as its timing mechanism. This general arrangement was originally developed by Len Surtees. You can find more about his timers and glider kits at his web site, Sting Aero Products.
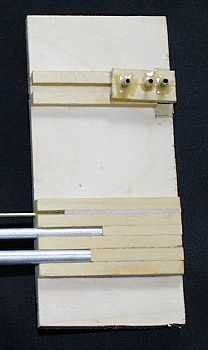
JigsI made up a jig to help me cut the tubes to length and square. It also has a section that guides the process of drilling holes in the inner tube. The jig base is 6 mm ply with 4.5 mm square spruce rails glued on to act as tubing guides. The drilling jig uses the same 4.5 mm spruce tube guides capped with a piece of 12mm x 3mm spruce. This is drilled to accept three 1.6mm ID x 12 mm brass tubes. These are epoxied in and act as drill guides. Small ply pads are attached so that, when the d/t band anchor hole and one of the other holes has been drilled, the band anchor can be slipped in and the inner tube turned 90 degrees before drilling the final hole. During this operation the ply pads will prevent the tube from rotating because the d/t band anchor rests across them. The photo shows the completed jig system. You can see tubes placed in the three cutting jigs. In practise, each tube is put in the jig and cut separately. The inner 3.0mm tube is then put in the drilling jig and the two end holes are drilled. The tube is removed, the band anchor put in its hole and the tube replaced in the jig while the third hole is drilled. |
 |
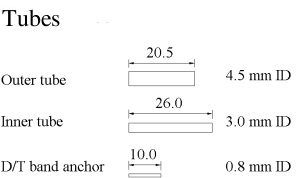
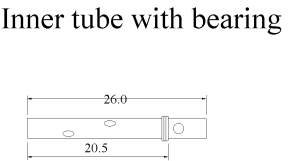
Make the tubesMake the tubes forming the timer. The outer alloy tube is 4.5 mm ID, 20.5 mm long. The inner alloy tube is 3.0 mm ID, 26 mm long. The d/t band anchor, made from 0.8 mm ID brass tube, is approximately 10 mm long. Make sure there are no sharp edges at the ends of any of the tubes. |
 |
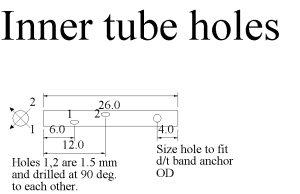
Drill holes in the inner tubeDrill holes in the inner tube. The hole for the d/t band anchor must be sized to be a close fit on the d/t band anchor. It is shown as a 1.5 mm hole because that is correct for the tubing I used to make the anchor. Don't put it closer than 4 mm to the end of the inner tube or the band may slip over the end of the inner tube instead of winding round it. The other holes must be 1.5 mm in diameter and drilled at right angles to each other. |
 |
Fit the d/t band anchorFit the d/t band anchor into the small holes at the end
of the inner tube and secure it in place with thin
cyanoacrylate. Use a fine file to finish one end off flush
with the tube surface and round off the other end.
|
|
Make the bearingNow make a bearing to take the d/t band tension and allow the inner tube to rotate in the outer tube. Spot glue the end of the nylon monofilament line, which should be 0.31 - 0.32 mm in diameter, to the tube and wind on three turns. Secure it with thin cyanoacrylate glue. Start exactly 5.5 mm from the end of the inner tube with the small holes and wind toward the far end, keeping the thread in contact with previous turns. Use cyanoacrylate accelerator or it will be difficult to get a good bond between the monofilament and the alloy tube. Trim the monofilament so there isn't a projecting end. If you prefer, you can use linen thread or Dacron fishing line in place of the nylon monofilament. Check that the bearing fits inside the outer tube without being too loose and that the inner tube turns easily. If this isn't the case, try again with a different sized thread. |
 |
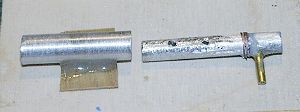
Roughen the inner tubeScuff the surface of the inner tube with coarse (100 - 150 grit) sandpaper. This photo shows the completed subassemblies. The inner tube has been scuffed up with a coarse Permagrit block. The parts are ready to be filled with silly putty and fitted together. |
 |
Fill the timer with silly puttyPush silly putty into the inner tube from the end that's away from the d/t band anchor using a piece of thick wire. Pack it in until the putty squeezes out of the holes drilled in the tube. I used a piece of 3 mm carbon rod to pack it in, which worked well. A 3 mm wooden dowel would probably do the job too though it might need sanding down because dowels are often a little oversize. Block the d/t band anchor end of the inner tube with a blob of epoxy or cyano. This stops silly putty gradually oozing out through this end during use. Put some silly putty into the outer tube and then steadily push the inner tube into it. Block off the end of the outer tube on the bench while you're doing this so the silly putty doesn't escape. Continue to slowly work the inner tube into the outer tube until the wound monofilament bearing is inside the end of the outer tube. The outer tube may have to be lifted off the bench toward the end of this operation to finally position the inner tube so its bearing is entirely inside the outer tube. |
 |
It is very important that both tubes are packed full of silly putty up to the monofilament bearing.
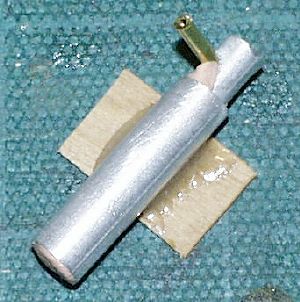
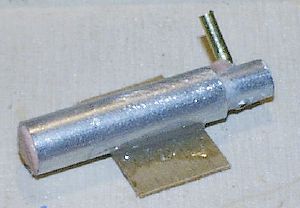
The last photo shoes the completed timer. Note that you can see the silly putty at the base of the timer and that a little has oozed out past the bearing. The first two timers I made weighed 1.17 and 1.20 grams respectively. This weight includes the ply mounting plate and the epoxy used to glue it to the timer.
When the timer is fitted to a model its important that the mounting method blocks off the open end of the outer tube. Remove putty from this end of the outer tube with a scalpel blade or modelling knife before installing it in the model. This lets the timer fit more closely against the part of the model that blocks off the tube and so reduces the amount of putty that can escape during normal usage.
Occasionally you'll need to repack the timer with silly putty because it will begin to skip. Push the inner tube out of the timer, repack both tubes with silly putty and reinstall the inner tube as described above.
Rotate the inner tube to set the d/t by pushing on the d/t anchor with your thumb. Always rotate the tube slowly when you're doing this or the timer may not be consistent. If you stress silly putty fast enough it snaps instead of deforming and this breakage ruins the timer's consistency.